-->
Showing posts with label Client Object Model. Show all posts

Create Folders and Sub Folders using SharePoint REST web services

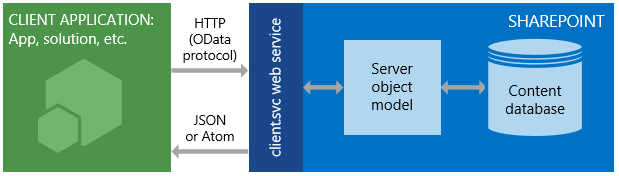
We can able to create the SharePoint List/Library Folders using REST web services.

<script type="text/javascript">

function CreateFolder (){
    var url_web;
    var pictureLibrary
    var folder_name;
    var folder_path;
    var mainfolder = ["Baikalit-SKC", "MC-Irkutsk", "Orion", "PM-Auto", "Sot motors", "STS-avtomobili"];
   
    var arr = ["0_Dealer general info", "1_Sales", "2_Aftersales", "3_Network", "4_Finance", "5_Marketing", "6_Training"];
    url_web = _spPageContextInfo.webAbsoluteUrl;
    pictureLibrary = 'Dealer Performance Monitor';
    //folder_name = 'jasonscript';
    for ( var j = 0, M = mainfolder.length; j < M; j++ ) {
        for ( var i = 0, l = arr.length; i < l; i++ ) {
            folder_path = pictureLibrary + '/9_Siberian FD/'+mainfolder[j]+'/' + arr[i];
            jQuery.ajax({
                'url' : url_web + "/_api/Web/Folders/Add('"+ folder_path + "')",
                'type' : 'POST',
                'headers' : {
                    'accept' : 'application/json; odata=verbose',
                    'content-type' : 'application/json; odata=verbose',
                    'X-RequestDigest' : $('#__REQUESTDIGEST').val()
                },
                'success' : function (evt){
                    // folder has been created
                   
                },
                'error' : function (jqXHR, textStatus, errorThrown){
                    // handle the error
                    alert(errorThrown);
                }
            });
        }
    }
    alert("Created Folder");
 }
</script>
<input type="button" Name="Submit" value="Create Sub Folder" onclick="CreateFolder();"></input>
<table border="0" cellpadding="0" width="100%" id='listPermsTable'> </table>

Get Current Loggedin User SharePoint Group Names using JQuery


To get the current user logged in SharePoint group name.
If you trying to iterate all the SharePoint groups the user may get access denied error.
Note: CSOM doesn't have impersonation facelity.

Here we can get only the specific group and find to get the logged user name


ExecuteOrDelayUntilScriptLoaded(IsCurrentUserHasContribPerms, 'SP.js');
function IsCurrentUserHasContribPerms() 
{
    IsCurrentUserMemberOfGroup("Members", function (isCurrentUserInGroup) 
    {
        if(isCurrentUserInGroup)
        {
            // The current user is in the [Members] group!
        }
    });
   

}

function IsCurrentUserMemberOfGroup(groupName, OnComplete) 
{

    var currentContext = new SP.ClientContext.get_current();
    var currentWeb = currentContext.get_web();

    var currentUser = currentContext.get_web().get_currentUser();
    currentContext.load(currentUser);

    var allGroups = currentWeb.get_siteGroups();
    currentContext.load(allGroups);

    var group = allGroups.getByName(groupName);
    currentContext.load(group);

    var groupUsers = group.get_users();
    currentContext.load(groupUsers);

    currentContext.executeQueryAsync(OnSuccess,OnFailure);

    function OnSuccess(sender, args) {
        var userInGroup = false;
        var groupUserEnumerator = groupUsers.getEnumerator();

        var OwnergroupUserEnumerator = OwnergroupUsers.getEnumerator();
   var statusval= $("select[title='ApprovalStatus'] option:selected").val();
        while (OwnergroupUserEnumerator.moveNext()) {
            var OwnergroupUser = OwnergroupUserEnumerator.get_current();
            if (OwnergroupUser.get_id() == currentUser.get_id()) {
                userInGroup = true;
               
                break;
            }
        }


        OnComplete(userInGroup);
    }

    function OnFailure(sender, args) {
        OnComplete(false);
    }    
}

JQuery Modal Dialog Box


How to show modal dialog box using JQuery. Here we can set multiple buttons with styles, we can include more dialog properties
Heading1
Title
Project
$(function () { $("#projectDetails").dialog({ autoOpen: false, height: 500, width: 700, modal: true, closeOnEscape: false, show: { effect: "slideDown", duration: 1000 }, hide: { effect: "slideUp", duration: 500 }, // open: function(event, ui) { // var el = $(this).closest('.ui-dialog').find('.ui-dialog-titlebar-close'); // el.off(); // el.on("click", fnCustomerHandler); // }, buttons: [ { text: "Save", icons: { primary: "ui-icon-mail-closed" }, click: function () { // Call you function here } }, { text: "Save1", icons: { primary: "ui-icon-disk" }, click: function () { // Call you function here } }, { text: "Cancel", icons: { primary: "ui-icon-circlesmall-close" }, click: function () { var r = confirm("Are you sure to close the popup!"); if (r == true) { $(this).dialog("close"); // window.location.href = "http://regula:19430/ITProjectPortfolio"; return true; } else { } } } ] }); }); // to open open this you can call as below $("#projectDetails").dialog("open"); // projectDetails ID of your popup main div tag

Get and Set SharePoint 2013 People Picker Field using JQuery


Get and Set the Users or Names on SharePoint 2013 People Picker (Person Group) field on Custom List Forms using JQuery.

The SharePoint 2013 Client People Picker on Custom List forms is different from OOB control.
The "div" structure is different when compare with both. So we have to write different script on custom forms.

The below code will give an example to get and set the values for Client People Picker or Person Group Field on Custom List forms.


// Get People Picker Values
function getEditorPeoplePickerValues(fieldName) { // Field Title
        editorNames = "";
        var _PeoplePicker = $("div[title='" + fieldName + "']");
        var _PeoplePickerTopId = _PeoplePicker.attr('id');
        var ppobject = SPClientPeoplePicker.SPClientPeoplePickerDict[_PeoplePickerTopId];
        editorsInfo = ppobject.GetAllUserInfo();

        var i;
        for (i = 0; i < editorsInfo.length; ++i) {
            editorNames += editorsInfo[i].DisplayText + ";#";
        }
    }

// Set People Picker Values
function SetAndResolvePeoplePicker(fieldName, userAccountName) {
       // alert(userAccountName);
        var _PeoplePicker = $("div[title='" + fieldName + "']");
        var _PeoplePickerTopId = _PeoplePicker.attr('id');
        var _PeoplePickerEditer = $("input[title='" + fieldName + "']");

        userAccountName.split(";#").forEach(function (part) {
   if (part !== "" && part !== null) {
          //  alert(part);
            _PeoplePickerEditer.val(part);
            var _PeoplePickerOject = SPClientPeoplePicker.SPClientPeoplePickerDict[_PeoplePickerTopId];
            _PeoplePickerOject.AddUnresolvedUserFromEditor(true);
   }
        });

    }

// How to use the above function on our code

call direct function to get values. but to set values we have to create an array with names.
var editorNames = "";
getEditorPeoplePickerValues("Field Title");
SetAndResolvePeoplePicker("Field Title", editorNames );

SharePoint get deleted names from People Picker Field using jquery


Get deleted names or entries from SharePoint 2010 format People Picker control on list forms using JavaScript or JQuery.

Here we have to get values from the people picker at OnLoad and PreSaveAction and we have to get the values and set the values as below.


/*  */

var onloadViewerNames = [];
var presaveViewerNames = [];

jQuery(document).ready(function () {
 onloadViewerNames = getPickerInputElement("ff2"); // Get Viewer Names on load  
}); 

function PreSaveAction() {
 presaveViewerNames = getPickerInputElement("ff2"); // Get Viewer Names on pre save 
 var getDeletedViewer = $(onloadViewerNames).not(presaveViewerNames).get();
 var delvalues= "";
 if(getDeletedViewer.length){
  for (var i=0; i < getDeletedViewer.length; i++) {
   delvalues += getDeletedViewer[i] + "; ";
  }
  setPickerInputElement("ff6", delvalues)
 }
 
 return true;
}

// Get Users/Names from the Poeple Picker
function getPickerInputElement(identifier) {
 var tags = document.getElementsByTagName('DIV');
 var returnval = [];
 for (var i=0; i < tags.length; i++) {
  var tempString = tags[i].id;
  if ((tempString.indexOf(identifier) > 0) && (tempString.indexOf('UserField_upLevelDiv') > 0)){
   var innerSpans = tags[i].getElementsByTagName("SPAN");
   for(var j=0; j < innerSpans.length; j++) {
    if(innerSpans[j].id == 'content') {
     //return innerSpans[j].innerHTML;
     returnval.push(innerSpans[j].innerHTML);
    }
   }
  }
 }
 return returnval; 
}

// Set Deleted Users into another People Picker
function setPickerInputElement(identifier, value) {
  var tags = document.getElementsByTagName('DIV');

  for (var i=0; i < tags.length; i++) {
    var tempString = tags[i].id;
    //alert('tags[' + i + '].id = ' + tempString);
    if ((tempString.indexOf(identifier) > 0) && (tempString.indexOf('UserField_upLevelDiv') > 0)){
      //alert('HIT for ' + identifier + ' id=' + tags[i].id + ' value=' + tags[i].value);
      tags[i].innerHTML = value;
      break;
    }
  }
}

SharePoint CSOM Validate People Picker fields

Get SharePoint People Picker Value using Java Script


var PickerPerson = getPickerInputElement("ff13"); // Here ff13 is your people picker control ID

function getPickerInputElement(identifier) {
var tags = document.getElementsByTagName('DIV');
for (var i=0; i < tags.length; i++) {
var tempString = tags[i].id;
if ((tempString.indexOf(identifier) > 0) && (tempString.indexOf('UserField_upLevelDiv') > 0))        {
var innerSpans = tags[i].getElementsByTagName("SPAN");
for(var j=0; j < innerSpans.length; j++) {
if(innerSpans[j].id == 'content') {
return innerSpans[j].innerHTML;
}
}
}
}
return null;
}

Validate and compare the people picker values..

<script type="text/javascript">

function PreSaveAction(){

var OwnerVal = getPickerInputElement("ff4");
var ManagerVal = getPickerInputElement("ff5");
if(OwnerVal == ManagerVal){
alert("Please enter different names.");
return false;
}
else{
return true;
}
}

function getPickerInputElement(identifier) {
var tags = document.getElementsByTagName('DIV');
for (var i=0; i < tags.length; i++) {
var tempString = tags[i].id;
if ((tempString.indexOf(identifier) > 0) && (tempString.indexOf('UserField_upLevelDiv') > 0)){
var innerSpans = tags[i].getElementsByTagName("SPAN");
for(var j=0; j < innerSpans.length; j++) {
if(innerSpans[j].id == 'content') {
return innerSpans[j].innerHTML;
}
}
}
}
return null;
}

</script>

SharePoint 2013 REST service

SharePoint 2013 introduces a Representational State Transfer (REST) service that is comparable to the existing SharePoint client object modelsNow, developers can interact remotely with SharePoint data by using any technology that supports REST web requests. This means that developers can perform CreateReadUpdate, and Delete (CRUD) operations from their SharePoint Add-ins, solutions, and client applications, using REST web technologies and standard Open Data Protocol (OData) syntax.


How the SharePoint 2013 REST service works

SharePoint 2013 adds the ability for you to remotely interact with SharePoint sites by using REST. Now, you can interact directly with SharePoint objects by using any technology that supports standard REST capabilities.
To access SharePoint resources using REST, construct a RESTful HTTP request, using the Open Data Protocol (OData) standard, which corresponds to the desired client object model API. For example:
Client object model method:
List.GetByTitle(listname)
REST endpoint:
http://server/site/_api/lists/getbytitle('listname')
The client.svc web service in SharePoint handles the HTTP request, and serves the appropriate response in either Atom or JSON (JavaScript Object Notation) format. Your client application must then parse that response. The figure below shows a high-level view of the SharePoint REST architecture.
SharePoint REST service architecture


Use HTTP commands with the SharePoint 2013 REST service

To use the REST capabilities that are built into SharePoint 2013, you construct a RESTful HTTP request, using the OData standard, which corresponds to the client object model API you want to use. The client.svc web service handles the HTTP request and serves the appropriate response in either Atom or JavaScript Object Notation (JSON) format. The client application must then parse that response.
The endpoints in the SharePoint 2013 REST service correspond to the types and members in the SharePoint client object models. By using HTTP requests, you can use these REST endpoints to perform typical CRUD operations against SharePoint entities, such as lists and sites.
In general:
If you want to do this to an endpoint Use this HTTP request Keep in mind
Read a resource GET
Create or update a resource POST Use POST to create entities such as lists and sites. The SharePoint 2013 REST service supports sending POST commands that include object definitions to endpoints that represent collections.
For POST operations, any properties that are not required are set to their default values. If you attempt to set a read-only property as part of a POST operation, the service returns an exception.
Update or insert a resource PUT Use PUT and MERGE operations to update existing SharePoint objects.
Any service endpoint that represents an object property set operation supports both PUT requests and MERGE requests.
  • For MERGE requests, setting properties is optional; any properties that you do not explicitly set retain their current property.
  • For PUT requests, if you do not specify all required properties in object updates, the REST service returns an exception. In addition, any optional properties you do not explicitly set are set to their default properties.
Delete a resource DELETE Use the HTTP DELETE command against the specific endpoint URL to delete the SharePoint object represented by that endpoint.
In the case of recyclable objects, such as lists, files, and list items, this results in a Recycle operation.


Construct REST URLs to access SharePoint resources 

Whenever possible, the URI for these REST endpoints closely mimics the API signature of the resource in the SharePoint client object model. The main entry points for the REST service represent the site collection and site of the specified context.
To access a specific site collection, use the following construction:
http://server/site/_api/site
To access a specific site, use the following construction:
http://server/site/_api/web
In each case, server represents the name of the server, and site represents the name of, or path to, the specific site.
From this starting point, you can then construct more specific REST URIs by ''walking" the object model, using the names of the APIs from the client object model separated by a forward slash (/).


SharePoint REST endpoint examples


The following table contains typical REST endpoint URL examples to get you started working with SharePoint data. Prependhttp://server/site/_api/ to the URL fragments shown in the table to construct a fully qualified REST URL. Where necessary for POST commands, the table contains sample data you must pass in the HTTP request body to create the specified SharePoint item. Items in italics represent variables that you must replace with your values.


Description URL endpoint HTTP method Body content
Retrieves the title of a list
web/title
GET
Not applicable
Retrieves all lists on a site
lists
GET
Not applicable
Retrieves a single 'list's metadata
lists/getbytitle('listname')
GET
Not applicable
Retrieves items within a list
lists/getbytitle('listname')/items
GET
Not applicable
Retrieves a specific property of a document. (In this case, the document title.)
lists/getbytitle('listname')?select=Title
GET
Not applicable
Creates a list
lists
POST
{
  '_metadata':{'type':SP.List},
  'AllowContentTypes': true,
  'BaseTemplate': 104,
  'ContentTypesEnabled': true,
  'Description': 'My list description',
  'Title': 'RestTest'
}
Adds an item to a list
lists/getbytitle('listname')/items
POST
{
  '_metadata':{'type':SP. listnameListItem},
  'Title': 'MyItem'
}

fdsfds fsdf

SharePoint Client Object Model using JQuery and SPServices


Add, Select, Update and Delete List items using JQuery.

JQuery using  SPServices:

<script src="/_LAYOUTS/MyJS/jquery-1.6.1.min.js" type="text/javascript"></script>
<script src="/_LAYOUTS/MyJS/jquery.SPServices-2014.01.min.js" type="text/javascript">

</script><script language="javascript" type="text/javascript">

$(document).ready(function() {
    $("#createitem").click(function() {

var valtitle = $("#txtTitle").val();
var valcol = $("#txtcol123").val();

CreateNewItem(valtitle, valcol);
               

    });

$("#updateItem").click(function() {

var valtitle = $("#txtTitle").val();
var valcol = $("#txtcol123").val();
                var itemID = $("#txtID").val();

                UpdateItem(itemID, valtitle, valcol);

    });

$("#getItem").click(function() {

var itemID = $("#txtID").val();

                GetSingleItem(itemID);

    });

});

Create New List Item:


function CreateNewItem(valtitle, valcol) {
    $().SPServices({
        operation: "UpdateListItems",
        async: false,
        batchCmd: "New",
        listName: "list123",
        valuepairs: [["Title", valtitle], ["_x0063_ol123", valcol]],
        completefunc: function(xData, Status) {
          alert("Item Created!");
        }
    });
}

Update List Item:

function UpdateItem(itemID, valtitle, valcol)

    {
        $().SPServices({
            operation: "UpdateListItems",
            async: false,
            listName: "list123",
            ID: itemID,
            valuepairs: [["Title", valtitle], ["_x0063_ol123", valcol]],
            completefunc: function(xData, status){
               alert("Item Created!");
               }
        });
    }

Get List Item:

function GetSingleItem(itemID)

    {
        $().SPServices({
            operation: 'GetListItems',
        async: false,
        //debug: true,
        listName: 'list123',
        CAMLViewFields: '<ViewFields><FieldRef Name="Title" /><FieldRef Name="_x0063_ol123" /></ViewFields>',
        CAMLQuery: '<Query><Where><Eq><FieldRef Name="ID"/><Value Type="Counter">' + itemID + '</Value></Eq></Where></Query>',
        completefunc: function(xData, Status) {

            $(xData.responseXML).SPFilterNode("z:row").each(function() {
                $("#txtTitle").val($(this).attr("ows_Title"));
                $("#txtcol123").val($(this).attr("ows_col123"));
            });
        }        });
    }
</script>

HTML :

ID:<br/>
<input name="txtID" id="txtID" type="text"/> <br/>
Title:<br/>
<input name="txtTitle" id="txtTitle" type="text"/> <br/>
Col 123:<br/>
<input name="txtcol123" id="txtcol123" type="text"/> <br/>
<input id="createitem" type="button" value="Create Item"/>
<input id="updateItem" type="button" value="Update Item"/>
<input id="getItem" type="button" value="Get Single Item"/>

SharePoint Client Object Model using ECMAScript


To load the Java script Client Object Model, 
we have to call ExecuteOrDelayUntilScriptLoaded(Func, "sp.js") . This function takes the name of the function that need to be executed as a main function and will load the SP.js file, which is the core of Client Object Model. We have to load the current context in order to play with the site content by SP.ClientContext and then get the current site by calling get_web()function of current context. After getting the current site we call getByTitle to get the Product list and then we loaded that list. Note that we are not loading all the objects but only the list. Loading all the objects will cause delay and performance issues. We are loading the list asynchronously and if the call is successful OnSuccess()will be called and if the call failes OnFail() will be called.


Writing the ECMAScript

  1. Create a list called Product and add few items in it.
  2. Create a test ASPX page in the Pages library.
  3. Add the Content Editor web part and add the following script in it.

Creating a List Item Using ECMAScript (JavaScript, JScript)


var siteUrl = '/sites/MySiteCollection';

function createListItem() {

    var clientContext = new SP.ClientContext(siteUrl);
    var oList = clientContext.get_web().get_lists().getByTitle('Announcements');
        
    var itemCreateInfo = new SP.ListItemCreationInformation();
    this.oListItem = oList.addItem(itemCreateInfo);
        
    oListItem.set_item('Title', 'My New Item!');
    oListItem.set_item('Body', 'Hello World!');
        
    oListItem.update();

    clientContext.load(oListItem);
        
    clientContext.executeQueryAsync(Function.createDelegate(this, this.onQuerySucceeded), Function.createDelegate(this, this.onQueryFailed));
}

function onQuerySucceeded() {

    alert('Item created: ' + oListItem.get_id());
}

function onQueryFailed(sender, args) {

    alert('Request failed. ' + args.get_message() + '\n' + args.get_stackTrace());
}

Updating a List Item Using JavaScript

var siteUrl = '/sites/MySiteCollection';

function updateListItem() {

    var clientContext = new SP.ClientContext(siteUrl);
    var oList = clientContext.get_web().get_lists().getByTitle('Announcements');

    this.oListItem = oList.getItemById(3);

    oListItem.set_item('Title', 'My Updated Title');

    oListItem.update();

    clientContext.executeQueryAsync(Function.createDelegate(this, this.onQuerySucceeded), Function.createDelegate(this, this.onQueryFailed));
}

function onQuerySucceeded() {

    alert('Item updated!');
}

function onQueryFailed(sender, args) {

    alert('Request failed. ' + args.get_message() + '\n' + args.get_stackTrace());
}

Deleting a List Item Using JavaScript

var siteUrl = '/sites/MySiteCollection';

function deleteListItem() {

    this.itemId = 2;

    var clientContext = new SP.ClientContext(siteUrl);
    var oList = clientContext.get_web().get_lists().getByTitle('Announcements');

    this.oListItem = oList.getItemById(itemId);

    oListItem.deleteObject();

    clientContext.executeQueryAsync(Function.createDelegate(this, this.onQuerySucceeded), Function.createDelegate(this, this.onQueryFailed));
}

function onQuerySucceeded() {

    alert('Item deleted: ' + itemId);
}

function onQueryFailed(sender, args) {

    alert('Request failed. ' + args.get_message() + '\n' + args.get_stackTrace());
}

Example: 2

var siteUrl = '/sites/MySiteCollection';

function deleteListItemDisplayCount() {

    this.clientContext = new SP.ClientContext(siteUrl);
    this.oList = clientContext.get_web().get_lists().getByTitle('Announcements');

    clientContext.load(oList);

    clientContext.executeQueryAsync(Function.createDelegate(this, this.deleteItem), Function.createDelegate(this, this.onQueryFailed));
}

function deleteItem() {

    this.itemId = 58;
    this.startCount = oList.get_itemCount();
    this.oListItem = oList.getItemById(itemId);

    oListItem.deleteObject();

    oList.update();

    clientContext.load(oList);
        
    clientContext.executeQueryAsync(Function.createDelegate(this, this.displayCount), Function.createDelegate(this, this.onQueryFailed));
}

function displayCount() {

    var endCount = oList.get_itemCount();
    var listItemInfo = 'Item deleted: ' + itemId + 
        '\nStart Count: ' +  startCount + ' End Count: ' + endCount;
        
    alert(listItemInfo)
}

function onQueryFailed(sender, args) {

    alert('Request failed. ' + args.get_message() + '\n' + args.get_stackTrace());
}


SharePoint Client Object Model

The concept of development using the Client Object model was introduced in SharePoint 2010 and has been carried to the new versions. With the introduction of client-side object model, developers have the ability to perform core SharePoint functionality by using C# (managed client object model), JavaScript and Silverlight.

Client-Side Object Model Fundamentals:

The managed and JavaScript client object model are maintained in separate libraries, which are located under a SharePoint system directory. The managed client object model is contained in the assemblies Microsoft.SharePoint.ClientRuntime.dll, which can be found in the ISAPI folder. The JavaScript client object model is contained in the library sp.js, which is located in the LATOUTS folder. Each of these models have different programming interfaces which interact with SharePoint through WCF service named client.svc as shown in below figure.


SharePoint Client Managed Object Model is a SharePoint API that runs on the client side. It converts the API calls made by the application, into XML request and sends it to the SharePoint server. On the server, the XML request is handled by a service called Client.svc where it translates the XML request in to appropriate Object Model calls (SharePoint Server Object Model) and gets the results. After getting the results, Client.svc translates them into JavaScript Object Notation (JSON) and sends back to the Client Managed Object Model. On the client side the JSON response is translated into ECMAScript objects for ECMAScript.

Initializing the Client-side object model:  


Much like the Server -side object model, which is the other framework for development in SharePoint, CSOM also needs a starting point in the form of a central object which will instantiate and provide access to the client object model.  This central object is called the Client Context. The Client Context object orchestrates requests and initiates actions within a site collection. Once the Client Context Object is initialized, it provides information to the site collection or website through which we can access other SharePoint client object remotely


Four client APIs


With the Client Object Model, Microsoft has introduced a set of new APIs to work with to ease the daily tasks of developers.


  1. .NET Managed Applications (using the .NET CLR)
  2. Silverlight Applications
  3. ECMAScript (JavaScript, JScript)
  4. REST

The client APIs provide you as a developer with a subset of the Microsoft.SharePoint namespace which is based on the server-side object model.